

How To Repair Carpet Edge
Carpet Maintenance Tips: three Quick Carpet Fixes
Updated: Jul. 02, 2022
Get pro results—without the pro price
Salvage a bundle by fixing common rug and rug issues like burn down spots, loose wall-to-wall rug, and wet carpeting using basic tools and know-how. This article walks you lot through the steps.
You might also like: TBD
Overview
The carpeting in your home is a large investment. So it'southward frustrating when a sputtering ember burns a hole in your cute rug or a spring storm floods the basement family unit room. Only you don't have to call in a pro or but live with the damage until you supersede the carpet. Solving these problems yourself isn't difficult, and you can increase the life of your rug and salvage some real coin.
We'll bear witness y'all how to fix 3 common problems:
- Minor damaged spots such every bit holes, tears or burns.
- Wet carpet from leaks or flooding.
- Rug that has pulled out of a metal threshold.
A carpet pro may charge hundreds for each of these repairs. If the repair involves a large area or the damage is more all-encompassing, the toll can double. Doing the work yourself can cut the cost by two-thirds. The tools and materials you'll need are at dwelling house centers; nigh cost $15 or less.
Patch a damaged spot
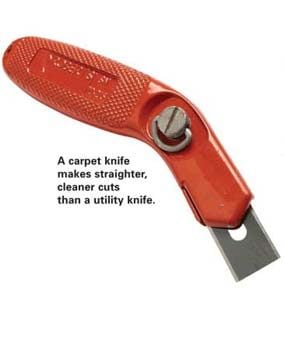
Carpeting knife
A carpet pocketknife makes straighter, cleaner cuts than a utility pocketknife.
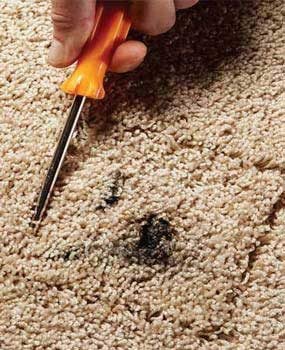
How to Fix Burned Carpet Photo 1: Marker the cut
Function the carpet fibers with a Phillips screwdriver. The parts mark your cut lines and allow you cut the backing without cutting or tearing the fibers.
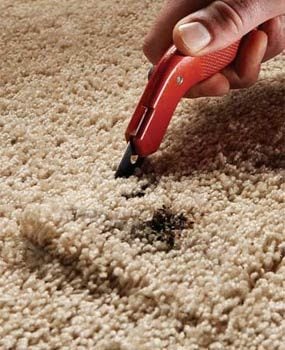
How to Gear up Burned Carpet Photograph 2: Cutting the carpet
Cut through the carpet backing. Make the cuts as straight every bit you tin and avert cut completely through the carpet pad.

How to Set up Burned Carpet Photo iii: Examination-fit the piece
Test-fit all the pieces of carpeting tape before y'all stick them in place permanently. Marker a square on the carpet pad to help align each piece later.
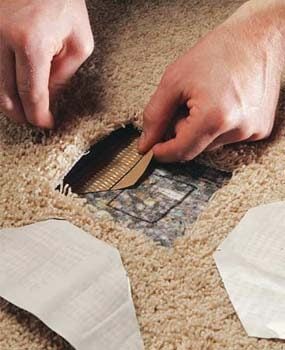
How to Fix Burned Rug Photo 4: Peel the record backing
Peel off the record'due south backing and set each piece in place, sticky side upwardly. Don't let the super-viscid tape bear on the carpet bankroll—or annihilation else—until it's in position.
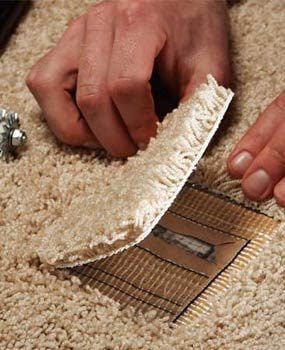
How to Fix Burned Carpet Photograph 5: Place the plug
Set the plug tightly against 1 side of the hole. So lower the other edges into place, holding back the surrounding fibers. Press the plug into the record with your fingers, so with a rug tractor.
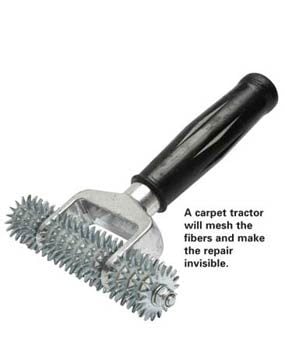
Rug tractor
A carpeting tractor will mesh the fibers and make the repair invisible.
Yous can patch a modest pigsty, tear or burn using techniques that volition brand the repair nigh invisible. You'll need a pocket-sized "plug" of rug that matches the damaged slice. If you lot don't accept a remnant, you tin steal a slice from inside a closet or underneath a piece of furniture you never intend to move. (This may sound extreme, but it's a lot cheaper than replacing the unabridged carpet.)
If you accept a "plush"-type rug with a flat surface and no pattern, you can make a repair that'due south admittedly invisible. If your rug has a color pattern, a textured surface pattern or looped yarn, y'all'll have to be fussier when you cut the plug, and the repair may be visible (but you're probably the just i who will observe information technology).
Before starting this repair, buy a carpet pocketknife that has replaceable blades. Y'all'll too need a roll of one-sided carpet tape. Exist sure to choose heavy-duty tape reinforced with mesh, not the thin, flimsy version or the "hot-melt" type that requires a special atomic number 26 to apply.
Carpet Burn Repair: Cut out the damage and a matching plug
Exist sure the area y'all're working in is well lit. To mark the area you'll cut out, function the rug fibers around the damage as if yous were parting your hair (Photo 1). Go on the function lines at least 1/2 in. from the damaged spot. Cut along the parts using a sharp, new blade in your rug knife (Photo 2).
Side by side, cutting a replacement plug, using the cutout every bit a template. To first, make a first cut in the replacement material, using a straightedge to guide your carpeting knife. Then prepare the cutout on the replacement material with one edge aligned along that commencement cutting. When yous lay the cutout on top of the replacement material, make certain their naps are running in the same direction. You lot can tell which direction the nap is running by rubbing your hand over the carpeting and watching which way the fibers fall or stand up. Once you have the cutout lined up correctly, part the fibers around the iii uncut sides just as yous did before.
Cutting forth the parts and exam-fit the plug in the cutout hole, making sure the nap of the plug matches the nap of the surrounding carpet. If the plug is a little too big, trim off a single row of fibers with sharp scissors (onetime, ho-hum scissors will tear the fibers).
Rug Burn Repair: Set the hole for the new plug
Cut pieces of rug tape and position them in the pigsty without removing the bankroll (Photo 3). Cut the ends of the record diagonally so the pieces volition frame the hole without overlapping. The tricky part is getting the tape positioned so information technology'south halfway under the plug and halfway under the surrounding carpeting. A helper makes this easier.
Subsequently mark their positions in the hole, remove the pieces from the hole and advisedly (this is mucilaginous stuff!) remove the protective bankroll from the tape. While pulling the carpeting upward with 1 paw, skid the tape pieces dorsum into the prepared hole one piece at a time (Photo 4). Be sure the edges of the tape line up with your markings.
Carpet Burn down Repair: Insert the plug
Now you're ready to fit the new plug into the hole. Pull the fibers of the surrounding carpet dorsum from the edges. Push one side of the plug lightly onto the record to make certain it's set exactly right—you lot actually just accept i shot at this (Photo 5). After yous're certain the plug is placed correctly, use your fingers to work in the direction of the nap all the manner around the hole as you press the plug downwards firmly onto each side of the tape.
A carpet tractor will exercise the best chore of meshing the fibers, merely a seam roller or even a rolling pin would work besides. Place a telephone book on top of the plug overnight. Trim any fibers sticking up with a sharp scissors. Yous'll exist surprised how "invisible" this repair is once you're finished. You can vacuum and clean your carpeting equally you normally would, and this repair should last as long equally your rug does.
Rescue moisture carpet
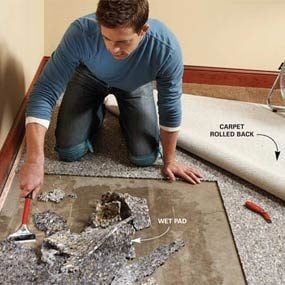
Photograph 1: Dry the rug
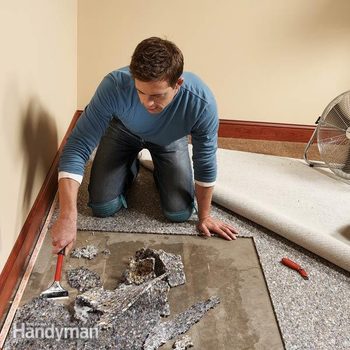
Dry out wet carpet right away. Fold back the carpet and start a fan. Cut around the soaked section of the pad and scrape it up.
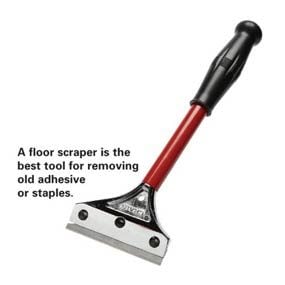
Floor scraper
A flooring scraper is the best tool for removing erstwhile adhesive or staples.

Photo 2: Lay replacement pad
Lay replacement pad after the flooring has stale. Duct-tape the seams where new pad meets old, and spike the pad to the floor with agglutinative or staples.
When carpet gets soaked, you have to human activity fast. The longer it stays soggy, the more than probable information technology is to stretch out, discolor or get moldy. If a large area is waterlogged, complete replacement may exist the best pick. But if only a corner or a small-scale room is soaked, yous can save the carpeting with simply a couple of hours of work.
Tear out the soggy pad
First, go to the corner nearest the wet expanse, grab the carpet with pliers and pull the carpet off the tack strip. Continue pulling the carpet off the tack strip past hand until you tin fold back the entire wet section. Run a fan or two to dry the carpet.
Wet carpet pad is like a large sponge. You take to get rid of information technology ASAP. Cut effectually the moisture surface area with a utility knife. Make straight cuts so y'all have straight seams when you patch in the new pad. If the pad is glued to a concrete floor, scrape it upwardly with a flooring scraper (Photograph 1). If the pad is stapled to a forest subfloor, just pull upwardly chunks of pad and pry or pull out the staples if you take just a few. For faster removal on a larger area, utilise a floor scraper. Accept garbage bags handy to prevent drips on the carpeting. Wet pad is heavy. Don't fill up the bags so full that yous can't haul them out without wrecking your dorsum!
Wipe upward any water on the floor, and then flop the wet rug back into place. Drying it flat and in identify helps the carpeting retain its shape. Run fans until the floor and carpet are completely dry out. This tin can take a couple of days.
Patch in the new pad
Measure out the surface area of pad you need to supercede and accept a piece of the old pad to a flooring store or home center to notice similar replacement pad. The color doesn't thing, just the new pad must exist the aforementioned thickness and density as the former pad. Some stores will cut the pad to the size you need.
Fasten the pad to a concrete floor with carpet pad adhesive and duct-tape the seams together (Photo 2). On a woods subfloor, all yous need is a staple gun and 5/16-in. staples. Utilize a utility pocketknife to trim off any pad covering the tack strip.
Reattach the carpet
Equally y'all refasten the carpet to the tack strip, yous need to stretch information technology toward the wall. If y'all're dealing with a corner or a small area, you lot tin utilize a genu kicker alone (see Photo 3). Starting at one end of the loose carpet, set the head of the kicker about 2 in. from the tack strip and nudge the rug tight against the wall. Strength the carpeting into the tack strip with a stiff putty knife. Also tuck the edge of the carpet into the infinite between the wall and the tack strip with a putty knife. Continue along the wall, moving the kicker over almost a few inches each time.
If you're dealing with a larger surface area of carpet or if the carpet has stretched out of shape, bubbled or wrinkled after getting wet, you'll need to rent a power stretcher to restretch the carpet.
Reattach pulled-out carpet

Photo i: Release the carpet
Bend open up the threshold's lip to release the carpet. Be conscientious not to snag the carpet every bit y'all push button the screwdriver under the lip.
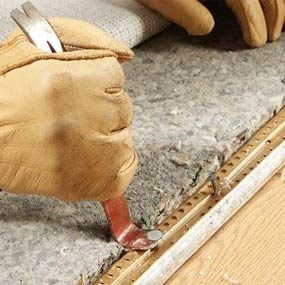
Photo 2: Pull the nails
Pry up the threshold just plenty to heighten the nail heads. Then pull the nails and remove the threshold. Work from the carpeted side to avoid scratching the hard flooring. Boom down a new threshold.
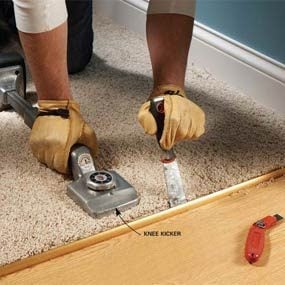
Photo iii: Kicking the rug tight
Nudge the carpet toward the threshold with a rented "knee kicker" and force the carpet into the threshold's teeth with a stiff putty knife.
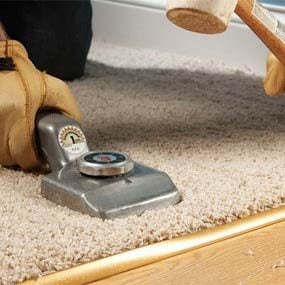
Photo 4: Lock the rug down
Drive down the lip, tapping gradually back and forth along its entire length. On the final pass, pound hard to lock the carpet into the threshold.
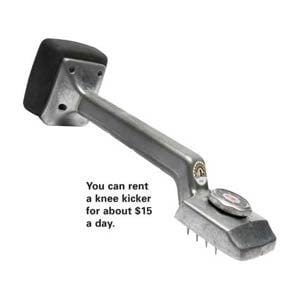
Genu kicker
You tin rent a genu kicker at rental centers or rug stores.
If you lot have carpet that has pulled loose from a metal threshold, fix it now, before the exposed edge of the carpet begins to fray. If the damage extends more than than an inch or so away from the threshold, you won't exist able to brand a good-looking repair. Aside from standard manus tools, you'll need a carpet knife and a knee kicker, which you tin can go at whatsoever rental center. You'll also demand a new metal threshold and 1-1/2-in. ring-shank drywall nails.
Remove the sometime threshold
This repair is much easier if yous first remove the door. You tin do it with the door in identify, but it'll take a niggling longer and yous risk scratching the door. Carefully pry up the lip of the existing metal threshold along its entire length using a screwdriver or flat pry bar (Photo 1). Since yous'll exist replacing the threshold, y'all don't have to worry virtually wrecking it, but yous want to work carefully so you don't damage the carpet border fifty-fifty more. Once the threshold lip is bent up, use pliers to gently pull the carpeting up from the teeth inside the threshold. Curlicue the carpeting back slightly to get it out of the style (yous can get out the carpeting pad in place).
Pry up the threshold slightly and pull the nails (Photo 2). To become an exact measurement for cutting the new threshold, don't measure the old threshold because it may be kinked. Instead, measure out the opening then cut the threshold with metallic snips or a hacksaw.
Install the new threshold
If the carpeting edge is in good shape, you can place the new threshold exactly where the old i was. If the edge is badly frayed, y'all'll need to trim off the damage using a rug knife and a straightedge. And then position the new threshold further into the carpeted room to recoup for the width you trimmed off. In most cases, y'all can place the new threshold well-nigh 1 in. from the original position, but non more than. If you've moved the threshold more than an inch, you may as well need to trim the carpet pad and so it doesn't embrace the threshold pins.
If you're working on a wood sub- floor, smash down the replacement threshold with 1-1/2-in. ring-shank drywall nails. On a concrete flooring, utilize heavy-duty construction adhesive to glue the threshold to the floor, and allow a day for information technology to dry before moving on to the next step.
Attach the carpeting
Now you're ready to attach the carpet to the new threshold. Starting at one end of the threshold, set the caput of the knee kicker most 2 in. from the threshold and kick with your knee to stretch the carpet toward the thresh- former (Photo 3). Kicking firmly, only not with all your strength or you lot might rip the carpet. Strength the carpet into the threshold teeth with a potent putty pocketknife. Then move the kicker over a few inches (the width of the kicker'southward head) and repeat the process until you accomplish the other end of the threshold. When you're done, tuck any loose rug under nearby baseboards with a stiff putty knife. Finally, pound down the threshold lip with a rubber mallet (Photo 4).
Required Tools for this Project
Have the necessary tools for this DIY projection lined up before you lot start—yous'll save time and frustration.
Yous'll too need a rug knife, pair of scissors, a rug tractor, a floor scraper, a fan, a knee kicker and leather gloves.
Required Materials for this Project
Avert last-minute shopping trips by having all your materials ready alee of time. Hither'south a listing.
Originally Published: July 02, 2022
Source: https://www.familyhandyman.com/project/carpet-maintenance-tips-3-quick-carpet-fixes/
0 Response to "How To Repair Carpet Edge"
Post a Comment